<rhq:input-property name="rhq.cassandra.rpc_port"
                    description="The port Cassandra listens on for Thrift requests"
                    required="false"
                    defaultValue="9160"
                    type="integer"/>
Terminology
??? Database
What do we call this database? We have been loosely referring to it as the metrics database, but I do not know if that is broad enough. We already know we are going to be storing events in this database. And even within metrics nomenclature, there seems to be a tendency to call out call time data separately from traits and numeric metrics.
Cassandra Node
A running instance of Cassandra. A cassandra node is typically started with the cassandra script on Linux and Unix platforms or cassandra.bat batch file on Windows. The main entry point for a Cassandra node is the class org.apache.cassandra.thrift.CassandraDaemon.
Embedded Node
A Cassandra node that runs in and shares the same JVM process with other applications. Embedding a Cassandra node in the RHQ server for example, would mean that the node is running in the same JVM as the RHQ server.
Embedded Cluster
Every node in the cluster runs on the same machine, and each node binds to a localhost alias, e.g., 127.0.0.1, 127.0.0.2, etc. More specifically, the localhost alias will be used for both inter-node communication (gossip) and for client, thrift RPC requests. Nodes in an embedded cluster can only receive requests from the same machine. It cannot talk to other nodes or clients running on other machines.
An embedded cluster will be used by default during development. An embedded cluster will be used along side the dev-container. Another, separate embedded cluster will be used for automated tests. An embedded cluster might also be useful for demos and even for small installations.
Non-embedded Cluster
Every node in the cluster binds to a hostname or IP address that is visible on the network. More specifically, the node can receive gossip (inter-node communication) requests as well as client, thrift RPC requests from other machines on the network. Note that it is possible in a non-embedded cluster to run multiple nodes on the same machine. It requires having a dedicated network interface for each node, and that interface needs to be visible on the network.
Dev Cluster
An embedded cluster used in conjunction with the rhqdev database and dev container.
Test Cluster
An embedded cluster used for automated tests. It is used in conjunction with the rhq database which is also used for automated tests.
Scaling Out
Adding more nodes to a cluster.
Scaling In
Removing nodes from a cluster.
Unmanaged Deployment
Installing, configuring, and starting an embedded cluster or node that is part of a non-embedded cluster without going through the agent. The same Ant-based bundles code is used as with any other bundle deployment. It is just that the bundle deployment is not executed through the agent.
Managed Deployment
Installing, configuring, and starting an embedded cluster, an embedded cluster node, a non-embedded cluster, or a non-embedded cluster node. This type of deployment operation is carried out by the agent.
Cassandra Configuration Changes
We do not rely on an external Cassandra installation. Instead we embed and deploy our own Cassandra installation similar to what we do with the JBoss AS in which RHQ runs. This allows us to more easily track and manage configuration changes. The following table briefly summarizes the configuration files that we modify and manage during the deployment process.
|
File |
Description |
|
cassandra.yaml |
Primary configuration file for Cassandra that effects a node's behavior. For example, if you to change the port on which Cassandra listens for different requests or change the directory where Cassandra stores its data files, then you would change properties in cassandra.yaml. |
|
cassandra-env.sh |
This mostly pertains to JVM configuration. For example, JVM heap size and JMX configurations are made here. |
|
log4j-server.properties |
Configures logging for Cassandra. |
Adding a New Configuration Property
There are a number of steps involved with adding a new property. Before I describe those steps, I need to explain what exactly is meant by adding a new property. It does not mean that we are adding a new property to one of the configuration files in the above table. Essentially it means that we are parameterizing a property in one of those files so that we configure it during deployment. If you are not already familiar with RHQ's provisioning, you might first want to read Ant Bundles before proceeding.
Step 1. Add property to cassandra.properties
The first thing to do is add the property to the cassandra.properties file in the cassandra-common module. This file serves a couple different purposes. It is used to configure the cluster deployment. For instance, you can set a property to specify the number of nodes that should get deployed (note that this only applies to embedded clusters). It is also used to set the values of properties in the bundle recipe file which correspond to parameterized properties in the above configuration files.
Property names should follow the same naming conventions used in other RHQ properties files. Segments of a property name should be separated by periods and if the prefix contains multiple words, then should should be separated with dashes, not underscores. All properties should start with a prefix of rhq.cassandra.
Step 2. Add input property to bundle recipe file
Next we need to add an input property to the deploy.xml file in the cassandra-common module. Let's suppose we are parameterizing the rpc_port property in cassandra.yaml, and we have already defined rhq.cassandra.rpc-port in cassandra.properties. In deploy.xml we would add,
Note that the bundle property name uses an underscore instead of a dash. There is a bug in the bundle parsing code that prevents using dashes in property names. Also note that the property's required attribute is set to false. There is another bug in the bundle code that will cause execution of a recipe file to fail if a property that is not required does not specify a default value.
Step 3. Add parameterized property to configuration file (see table above for list of configuration files)
Continuing with the example from step 2, we will replace the value of rpc_port in cassandra.yaml with the string, @@rhq.cassandra.rpc_port@@.
Step 4. Update RHQ container build script
Properties should be added to the Ant script, rhq-container.build.xml, in the appserver module so that they will be included in the generated rhq-server.properties file. There is a section in the prepare-bin-dir target where a number of Cassandra properties are added. Continuing with our previous example we would add the following,
rhq.cassandra.rpc-port=${rhq.cassandra.rpc-port}
The Ant script loads the properties in the cassandra.yaml that is found in the local Maven repo and uses these as default values for rhq-server.properties. Putting the properties in rhq-server.properties makes it convenient for developers to change cluster configuration. The properties in rhq-server.properties take precedence over the values in cassandra.yaml.
Step 5. Update DeploymentOptions.java
Configuration properties are loaded into an instance of DeploymentOptions both for container deployments (i.e., dev-container) as well as for tests. A getter/setter should be added for the property as follows,
private Integer rpcPort;
.
.
.
public int getRpcPort() {
    return rpcPort;
}

public void setRpcPort(int rpcPort) {
    if (rpcPort == null) {
        this.rpcPort = rpcPort;
    }
}
This effectively and easily allows properties in rhq-server.properties or more precisely properties specified as system properties to take precedence over the properties in cassandra.properties.
Server Start Up Use Cases
These use cases focus on deployment of RHQ's Cassandra cluster at server start up. For now you can assume that there are no schema changes with each scenario. The scenarios are intended to include development and testing environments, small production deployments, and large production deployments.
U1 Start RHQ server using embedded cluster where cluster is not yet installed.
-
Start RHQ server in maintenance mode
-
Store Cassandra bundle and bundle version in database.
-
Install embedded cluster using embedded cluster manager.
-
Start cluster using embedded cluster manager.
-
Install RHQ schema.
-
Kick off background job that runs periodically and attempts to connect to cluster.
-
Once a conection is established to a node, move the server from maintenance mode to normal mode.
-
-
Start agent.
-
Automatically import nodes into inventory.
-
Create resource group for cluster. (should this by a dynagoup?)
UI does not specify whether or the agent is running because in either case do follow the same steps. If the agent is running, we could install and start the cluster by submitting a bundle deployment. Since this is an embedded cluster, we rely on an embedded deployment regardless of whether or not the agent is running. This helps simplify the start up logic.
U2 Start RHQ server using embedded cluster where cluster is installed, cluster is not running.
-
Start RHQ server in maintenance mode.
-
Start cluster using embedded cluster manager.
-
Kick off background job that runs periodically and attempts to connect to cluster.
-
Once a connection is established to a node, move the server from maintenance mode to normal mode.
-
-
Start agent.
The fact that the cluster is already installed necessarily implies that the Cassandra bundle already exists in the database and that the schema already exists. Regardless of whether or not the agent is running, we rely on the embedded cluster manager to start the cluster. This helps simplify the start up logic.
U3 Start RHQ server using embedded cluster where cluster is installed, cluster is running.
-
Start RHQ server in maintenance mode.
-
Kick off background job that runs periodically and attempts to connect to cluster.
-
Once a connection is established to a node, move the server from maintenance mode to normal mode.
-
-
Start agent.
U4 Start RHQ server using non-embedded cluster where cluster is not yet installed. Agent is not yet installed
-
Run db install script.
-
Installs Cassandra node using embedded deployment.
-
Start Cassandra node.
-
Install Schema on node.
-
Install agent.
-
-
Start RHQ server in maintenance mode.
-
Store Cassandra bundle and bundle version in database.
-
Kick off background job that runs periodically and attempts to connect to cluster.
-
Once a conection is established to a node, move the server from maintenance mode to normal mode.
-
-
Start agent.
-
Automatically import nodes into inventory.
-
Create resource group for cluster.
We want the node up and running as quickly as possible so that the server can establish a connection to the cluster. Using an embedded deployment helps accomplish this. The db install script also installs the agent to ensure that the requirement of having an agent running along side the Cassandra node is satisfied.
U5 Start RHQ server using non-embedded cluster where cluster is installed, cluster is not running. Cluster nodes are in inventory.
-
Start RHQ server in maintenance mode.
-
Start agents on cluster node machines.
-
Start cluster using non-embedded cluster manager.
-
Kick off background job that runs periodically and attempts to connect to cluster.
-
Once a connection is established to a node, move the server from maintenance mode to normal mode.
-
In this scenario the cluster is already installed but not running. We can assume that the cluster is in inventory; otherwise, we are talking about use case U4. The cluster is started using the non-embedded cluster manager. This in effect means that the RHQ server sends request to agents to start the cluster nodes.
U6 Start RHQ server using non-embedded cluster where cluster is installed, cluster is running.
-
Start RHQ server in maintenance mode.
-
Kick off background job that runs periodically and attempts to connect to cluster.
-
Once a connection is established to a node, move the server from maintenance mode to normal mode.
-
-
Start agents.
Server Installation Use Cases
These use cases involve both new installs as well as upgrades. The focus is around the deployment of the metrics database cluster. For the first iteration of this, we plan on making the following changes for the installer and for the new database installer:
-
Update the installer so that the user can enter the hostname of machines on which database nodes will run.
-
The user will be required to specify at least one hostname.
-
The user can specify more than one hostname.
-
-
The user will install a database node similar to how he installs the agent.
-
Download the database installer.
-
Run the installer, e.g., java -jar rhq-metrics-db.jar --install /path/to/install/dir
-
U1 User performs new installation with single Cassandra node on the same machine on which the RHQ server is running.
-
Start installer.
-
For metrics database, specify the hostname of the machine on which the installer is running
-
Finish the installer wizard.
-
Log into RHQ.
-
Verify that the server is in maintenance mode.
-
Verify that in the server log you see the warning message, "<RHQ_SERVER> is unable to connect to any Cassandra node. Server will go into maintenance mode."
-
-
Download the database installer.
-
Run database installer
-
TODO Provide info on installer options. User may specify options like install directory, data directory, log directory, commit log directory, etc.
-
-
Start database node.
-
Wait a few minutes and verify that the RHQ server operating mode has changed from maintenance to normal.
-
Install and start agent.
-
Wait for agent to run discovery and send initial inventory report.
-
-
Verify that Cassandra node is automatically imported into inventory.
-
Verify that RHQ Cassandra Cluster resource group exists and has the node as a member.
U2 User performs new installation with two node cluster.
-
Start installer.
-
Specify hostnames of machines on which database nodes will run.
-
Finish the installer wizard.
-
Log into RHQ.
-
Verify that the server is in maintenance mode.
-
Verify that in the server log you see the warning message, "<RHQ_SERVER> is unable to connect to any Cassandra node. Server will go into maintenance mode."
-
-
Download the database installer to each machine on which database nodes will run.
-
Run database installer on each machine.
-
TODO Provide info on installer options. User may specify options like install directory, data directory, log directory, commit log directory, etc.
-
-
Start database nodes.
-
Wait a few minutes and verify that the RHQ server operating mode has changed from maintenance to normal.
-
Install and start agent on each machine.
-
Wait for agents to run discovery and send initial inventory reports.
-
-
Verify that Cassandra nodes are automatically imported into inventory.
-
Verify that RHQ Cassandra Cluster resource group exists and has both nodes as members.
Provisioning
This section is a follow up on the server starter use cases to further discuss how, when, and where provisioning (via bundles) is and will be used.
container
For development, a non-embedded cluster is used. When the RHQ server starts, an unmanaged deployment is performed if the non-embedded cluster does not already exist.
Automated Tests
For both agent plugin tests as well as for back end tests, we will want stand up a cluster which most of the time will be an embedded cluster. Currently there is support for executing an unmanaged deployment in automated tests. Once the Arquillian work in the rhq-on-as7 branch is further along, we will update the test code to support managed deployments as well.
QE Testing
I am differentiating this from automated tests as follows. This testing involves going running through the installer and then executing tests cases, whether the execution is manual or automated. This testing will involve an unmanaged deployment to bootstrap the RHQ Cassandra cluster. Depending on tests involved, it may also involve managed deployments. For example, if you are executing tests that involve expanding the cluster, then managed deployments will be involved.
Using CQL
The initial back end prototype was developed using the Cassandra client library Hector, which provides among other things an abstraction layer over Cassandra's Thrift API. When I was developing the prototype, I consider using a CQL script for defining the schema. I ultimately decided against it because at the time for the following reasons:
-
CQL was undergoing frequent changes making it more difficult to learn.
-
CQL and the cqlsh tool were not as well documented as the Cassandra CLI.
-
CQL and cqlsh seemed less stable than the CLI in large part due to the frequent changes.
For these reasons I chose to create the schema using a CLI script. When we decided to move forward with Cassandra I expressed that using CQL for client access in application code was not a viable option because of the inability to create dynamic column families/wide rows and the inability to perform range queries against those wide rows. It turns out that you can create dynamic column families/wide rows and query them using CQL. The key is that the table has to use a composite primary key, and the table must include at least one column that is not part of the primary key.
It is important to understand the differences between the CLI and CQL versions of the schema. Let's look at the raw_metrics column family to point out those differences.
(CLI) raw_metrics column family definition
create column family raw_metrics
    with comparator = DateType and
    default_validation_class = DoubleType and
    key_validation_class = Int32Type;
Note that no columns are declared. All columns are dynamic. Here is how the column family looks with some data.
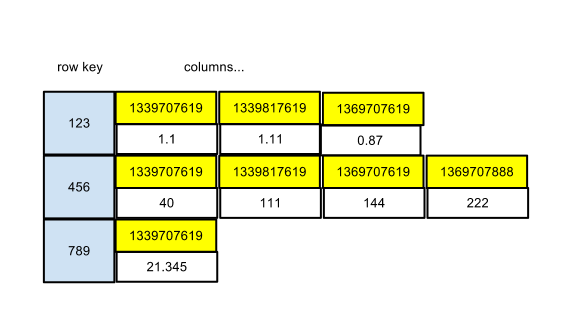
The row key is the schedule ID. Column names are the timestamps of the metric data. Column values are the actual values of the metric data. Now let's look at the CQL version.
(CQL) raw_metrics table definition
CREATE TABLE raw_metrics (
    schedule_id int,
    time timestamp,
    value double,
    PRIMARY KEY (schedule_id, time)
);
This is pretty straightforward and looks fairly similar to what we have with the CLI version. The next diagram highlights some important differences.
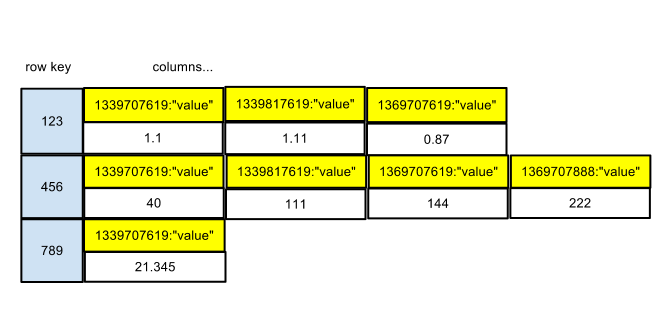
The row key is still the schedule ID. The column name is now a composite that consists of two components. In addition to the timestamp, the string literal value is stored as part of the column name. There was some concern about the additional disk space requirements, but the following section on storage requirements shows that there minimal overhead as a result of SSTables being compressed.
Using CQL for client access provides us with several advantages. We will be better able to leverage existing tooling. We get some ad hoc query capability. Developers get to use familiar SQL syntax instead of having to learn another library. Lastly, we will have to write less code for read and write operations. This all lead to easier maintenance for the long term. I wrote up a blog post that offers a more detailed explanation why the move to CQL makes sense. You can find it here.
Storage Requirements
One of the questions that has come is how much disk space is required to store a week, a month, a year, etc. of raw metric data. I have done some preliminary analysis to start answering these questions.
Scenario 1
In this scenario we insert raw metrics for a single schedule ID into a one-node cluster. We store one week's worth of metrics at a thirty second collection interval for a total of 20160 data points.
|
Schema |
Compression |
Unique Values |
Data Directory Size |
|
Thrift |
Snappy, 64 KB chunk length |
20160 |
384 KB |
|
Thrift |
none |
20160 |
800 KB |
|
Thrift |
Snappy, 64 KB chunk length |
5 |
300 KB |
|
Thrift |
none |
5 |
300 KB |
|
CQL |
Snappy, 64 KB chunk length |
20160 |
384 KB |
|
CQL |
none |
20160 |
860 KB |
|
CQL |
Snappy, 64 KB chunk length |
5 |
318 KB |
|
CQL |
none |
5 |
860 KB |
|
PostgreSQL* |
none |
5 |
3.02 MB |
* This test was run against PostgreSQL 9.1.4. The only configuration changes are those described in the RHQ installation notes. The existing implementation that uses PostgreSQL or Oracle uses a set of rotating tables for raw metrics. There are a total of 15 raw tables. The size of each table was calculated using the pg_size_pretty function. Here is a break down of the size by raw table.
|
Table |
Size |
|
rhq_meas_data_num_r00 |
216 KB |
|
rhq_meas_data_num_r01 |
216 KB |
|
rhq_meas_data_num_r02 |
216 KB |
|
rhq_meas_data_num_r03 |
216 KB |
|
rhq_meas_data_num_r04 |
216 KB |
|
rhq_meas_data_num_r05 |
216 KB |
|
rhq_meas_data_num_r06 |
216 KB |
|
rhq_meas_data_num_r07 |
216 KB |
|
rhq_meas_data_num_r08 |
216 KB |
|
rhq_meas_data_num_r09 |
216 KB |
|
rhq_meas_data_num_r10 |
216 KB |
|
rhq_meas_data_num_r11 |
216 KB |
|
rhq_meas_data_num_r12 |
216 KB |
|
rhq_meas_data_num_r13 |
120 KB |
|
rhq_meas_data_num_r14 |
168 KB |